deploy.azure.com is deprecated and will be decommisioned on 10/1/2020. Click here to learn how to continue using the Deploy To Azure button
After release v3 on .NET Core, we received the request to add button and deploy Virto Commerce Platform from a GitHub repository or any web site.
First, everything looks very simple. You should open this documentation and follow the wizard steps.
You can add a “Deploy to Azure” button (or any other image or link) to their GitHub repository by inserting it to their README.md file using standard markdown or Html.
[](https://portal.azure.com/#create/Microsoft.Template/uri/https%3A%2F%2Fraw.githubusercontent.com%2FVirtoCommerce%2Fvc-platform%2Fmaster%2Fazuredeploy.json)
When a user clicks on the Deploy to Azure button, the service loads an Azure Resource Manager (ARM) template. You can add a file called azuredeploy.json next to your README.md file. Properties that are exposed through your template will show up as input parameters in the site.
We had this file in v2, so we tried to copy it from the previous version and met several challenges, I hope our solutions and recommendations save your time when you try to deploy your .NET Core Application to Azure.
Overview
The following resources need to be created during deployment:
- Azure Storage - as Primary blob storage for CMS and Assets.
- SQL Azure - database.
- Website - Virto Commerce Platform.
Create ARM Template
Microsoft updated API specification for the required resources. The schemas were changed. No backward compatibilities. Easier to recreate it from scratch instead of trying to update from the previous version.
To learn about creating templates, read Understand the structure and syntax of ARM templates and API specification for each resource:
- Microsoft.Storage/storageAccounts 2019-06-01 - Bicep, ARM template & Terraform AzAPI reference | Microsoft Learn
- Microsoft.Sql/servers 2014-04-01 - Bicep, ARM template & Terraform AzAPI reference | Microsoft Learn
- Microsoft.Web/sites 2019-08-01 - Bicep, ARM template & Terraform AzAPI reference | Microsoft Learn
I found a simple way to understand a new schema:
- Create a resource in Azure.
- Export it as a template.
- Review and copy data to my template.
- Replace with variables.
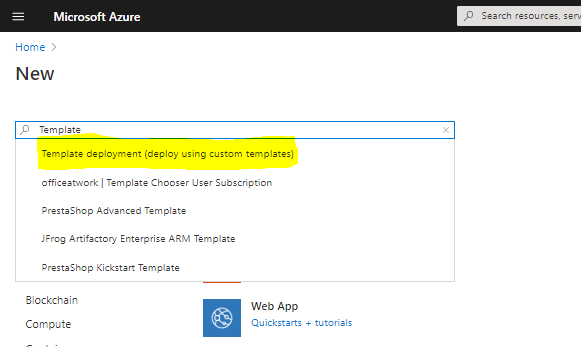
How to validate and test custom template
First, you can check Custom ARM Template in Azure Portal.
- Sign-in to Azure Portal.
- Select Template deployment to deploy using custom templates.
- Select Create.
- Select Build your own template in the editor.
- Load template file from azuredeploy.json.
- Select Save.
- Select Subscription and Fill the required parameters.
- Select Purchase.


Second, you can use ARM template test toolkit and check whether your template uses recommended practices. When your template isn’t compliant with recommended practices, it returns a list of warnings with the suggested changes. By using the test toolkit, you can learn how to avoid common problems in template development.
Finally, you can try a new what-if operation. The what-if operation is currently in preview. Before deploying an Azure Resource Manager (ARM) template, you can preview the changes that will happen. Azure Resource Manager provides the what-if operation to let you see how resources will change if you deploy the template. The what-if operation doesn’t make any changes to existing resources. Instead, it predicts the changes if the specified template is deployed.
Deploy .NET Core Web Application
Azure Documentation doesn’t provide any reference on how to set Stack settings to .NET Core.

We created a new application service, exported it as a template, and found that you should use custom metadata property CURRENT_STACK and value to dotnetcore for type Microsoft.Web/sites and 2018-11-01 API.
Custom build
The default build process will be failed because Virto Commerce repository contains several solutions and Azure could not resolve the source from multiple projects.
To resolve the issue, you need to create a custom build and add two files:
- .deployment - file to activate the custom build.
- deploy.cmd - file to describe steps in the custom build.
.deployment file:
[config]
command = deploy.cmd
What about deploy.cmd? Good news that you can export initial deployment script from Kudu:

Or generate it with Custom Deployment Script Generator.
And add your custom build commands.
Custom build for Backend and Frontend
Virto Commerce has two builds:
- Backend - C# to build .NET Core Application
- Frontend - WebPack to build Angular SPA
We added these steps into deploy.cmd. But when we run webpack, we got different errors.
By default, Application Service use lovest version of Node.Js. To build the frontend with webpack you need to define the required version of Node.JS.
You can do it by adding WEBSITE_NODE_DEFAULT_VERSION into application settings.
Resolve deployment problems
You create a custom template and upload azuredeploy.json next to your README.md file. But when you run it, you can see unexpected errors and etc without any details. Deploy problem can be related:
- Using “Free” plan, change to Basic or Standard. Read More.
- Your login name must not contain a SQL Identifier or a typical system name (like admin, administrator, sa, root, dbmanager, loginmanager, etc.) or a built-in database user or role (like dbo, guest, public, etc.)
- Your password must be at least 8 characters in length.
- Your password must contain characters from three of the following categories – English uppercase letters, English lowercase letters, numbers (0-9), and non-alphanumeric characters (!, $, #, %, etc.).

