Happy New Year and Welcome to January 2023 News Digest!

This post introduces the RESULTS of HAPPY 2022, new Virto Storefront and XAPI features, interaction with Google Analytics 4 and more.
You can learn the main innovations from this brief introduction:
- RESULTS of HAPPY 2022
- 4th Virto Commerce Stable Release Package
- New line-item component into Vue B2B Theme
- Quote Request Page
- Native Integration with Google Analytics 4
- SSO Provider via Custom Module
- Disable Administrators to Set Passwords
- “Added to lists” as one of the product properties
- XAPI for Dynamic Content
- Query Categories returns Root and Child Categories
- Creating New Block for Page Builder: Step-by-Step Instructions.
RESULTS of HAPPY 2022
Before presenting a new feature, let us summarise the RESULTS of HAPPY 2022 year.
We started 2022 with an update on .NET 6. It bring performance improvements as well as new features. VC on .NET6 works 30% faster and most of our clients already applied this update. We added Blue/Green indexation into Search engines. The list of supported search engines was extended with Elastic App Search and now it’s the favourite engine we recommend.
Then we released Virto Storefront 6 and Vue B2B Theme. Virto Storefront functionality was enriched with: Creation of a Design system, Re-design of the category page and enhancements of catalogue browsing experience, Corporate: Invite/Block/Delete members and add addresses, Google Analytics 4 integration, credit Card payment provider with Authorize.Net, Quotes, Search by branch availability and branch info page, Wish-list improvement, Category drop-down and header re-design.
You can find all 2022 features in Latest news digest topics.
And much more is awaiting in 2023.
4th Virto Commerce Stable Release Package
We published v4 Stable Release Package. You can find the package manifest and description here:
package manifest and descriptiuon of VC products - v4 2022 Q4 .
The 4th Virto Commerce Stable Release Package is 100% compatible with Virto Commerce Storefront v6.10 and Vue B2B Theme v1.17
Virto Commerce has always prided itself on the fast pace of innovation and rapid development of new functionality. We publish new releases for different modules with features, enhancements, and fixes daily.
You can find our latest releases in Virto Commerce GitHub repo and Global Module Manifest.
New line-item component into Vue B2B Theme

Quote Request Page
VueB2B Theme was improved with Quote page.

Native Integration with Google Analytics 4
Vue B2B Theme v1.17 brings native integration with Google Analytics 4 and sent e-commerce events: Select item event, View item event, View item list event, Add to cart event, View cart event, Remove from cart event and more.
To activate it, you need to install Google Analytics 4 module. It allows you to assign Google Analytics Measurement Id for store.
- Go to a Store Settings, select Settings and activate Google Analytics 4 and enter your Measurement Id.

- Once you click Save for Store Settings, the Google Analytics tracking will be activated.

SSO Provider via Custom Module
Virto Commerce allows to add a custom SSO provider via Virto Commerce module. For example, Google.
First, you need to create Google OAuth 2.0 Client in Google API & Services.
Second, create a new Virto Commerce Module and Configuration.
Third, you need to implement IExternalSignInProvider and register Google external provider implementation.
Finally, run the platform and open the Log in screen. An option to sign in with Google will show up. Select the Google button, which will redirect you to Google for authentication. After entering your Google credentials, you will be redirected back to the platform.

Find more details in the documentation
Disable Administrators to Set Passwords
To improve security, we added application settings to Disable administrators to set passwords for users in the system.
Setting name:
IdentityOptions:Password:PasswordChangeByAdminEnabled, default value true.
If you set the PasswordChangeByAdminEnabled to false.

Admin UI and API will limit changing the password for administrators.

“Added to lists” as one of the product properties
XAPI product model was extended with InWishlist field. InWishlist will be true if the product was added in user’s wishlist. You can use it to highlight product thumbnails and improve customer UX.

XAPI for Dynamic Content
The marketing module was extended with XAPI Query which allows to an evaluation of dynamic content. You can use to display banners, images, etc.

Query Categories returns Root and Child Categories
This query returns child categories for a specified parent category.
childCategories(storeId: !string, userId: string, cultureName: string, currencyCode: string, categoryId: string, maxLevel: int, onlyActive: boolean)
| # | Name | Type | Description |
|---|---|---|---|
| 1 | storeId | Non null StringGraphType | Store ID |
| 2 | userId | StringGraphType | Current user ID |
| 3 | currencyCode | StringGraphType | Currency code (e.g. “USD”) |
| 4 | cultureName | StringGraphType | Culture name (e.g. “en-US”) |
| 5 | categoryId | StringGraphType | Parent category ID or null for the root of the catalog |
| 6 | maxLevel | IntGraphType | The number of child category levels to return. 1 - direct children, 2 - direct children and grandchildren, and so on |
| 7 | onlyActive | BooleanGraphType | True - return only active child categories, False - return active and inactive child categories |
Example
query {
  childCategories(
    storeId: "test"
    categoryId: null
    maxLevel: 2
    onlyActive: true
  ) {
    childCategories {
      id
      name
      childCategories {
        id
        name
      }
    }
  }
}
Creating New Block for Page Builder: Step-by-Step Instructions
At this moment, Page Builder is a private module that is not included in the open-source license. You can request access here .
This tutorial will show you how to create a new block into Page Builder. We are going to create a simple block that will display selected products on the front end.
Step 1: Define Block Requirements
Let’s say your UI designer created the following mockup:

Step 2: Define Property List
Here, we have three property fields:
- Block title
- Description text in the rich text format
- Product list
Step 3: Create Block Descriptor
Each block has a descriptor file. It is a JSON file that contains all information about the block. The file is stored within the theme at the following path: /config/schemas/sections/<block-alias>.json.
Let’s give our block a name, say, demo-product-list, and create a file, demo-product-list.json, with the following content:
{ "name": "Demo products list", "icon": "inventory_2", "displayField": "name", "settings": [ { "id": "title", "label": "Title", "type": "string", "default": "Title for products" }, { "id": "content", "label": "Promo text", "type": "markdown", "resultType": "markdown", "default": "Here can be some promo text, or something similar to it\n\nLorem ipsum dolour sit amet, consectetur..." } ] }
At this point, we just added two fields. We will add other properties later.
Step 4: Add block to Template Descriptor
There may be many types of templates within a single theme, so we have to specify which templates our block may be used in.
This means we need to add our block to the page template descriptor. For that, open the file at /config/schemas/templates/page.json and add the block to the sections section:
{ ... "sections": [ ... "demo-product-list" ] ... }
Step 5: Add Block Layout
Finally, you need to add block layout. The layout is a file that contains HTML markup and logic for the block. Since we use the vc-theme-b2b-vue theme based on the Vue.js framework, the layout must also be a Vue component.
Open the theme and create the /client-app/shared/static-content/components/demo-product-list.vue file with the following content:
<template> <div class="pt-6 pb-16"> <div class="w-full max-w-screen-2xl mx-auto px-5 md:px-12"> <h2 class="text-2xl">{{ model.title }}</h2> <div class="text-lg"> <VcMarkdownRender :src="model.content" class="text-gray-500"></VcMarkdownRender> </div> </div> </div> </template> <script setup lang="ts"> defineProps({ model: { type: Object, required: true, }, }); </script>
Next, register the new block in the theme. Open the /client-app/shared/static-content/components/index.ts file and add the following line:
... import DemoProductList from "./demo-product-list.vue"; const templateBlocks: { [key: string]: Component } = { ... "demo-product-list": DemoProductList, }; ...
Now, we need to recompile the theme. Open the terminal in the theme folder and run the following command:
yarn run build
Step 6: Create New Page and Add Block to It
Open the admin panel, go to the current store content, open page list, click Add on the toolbar, and select Design page:

Fill out the page fields and click Create on the bottom of the screen:

Now, we need to add new block to the page. Click the Add block button on the left bottom part of the page builder and select the Demo product list block:

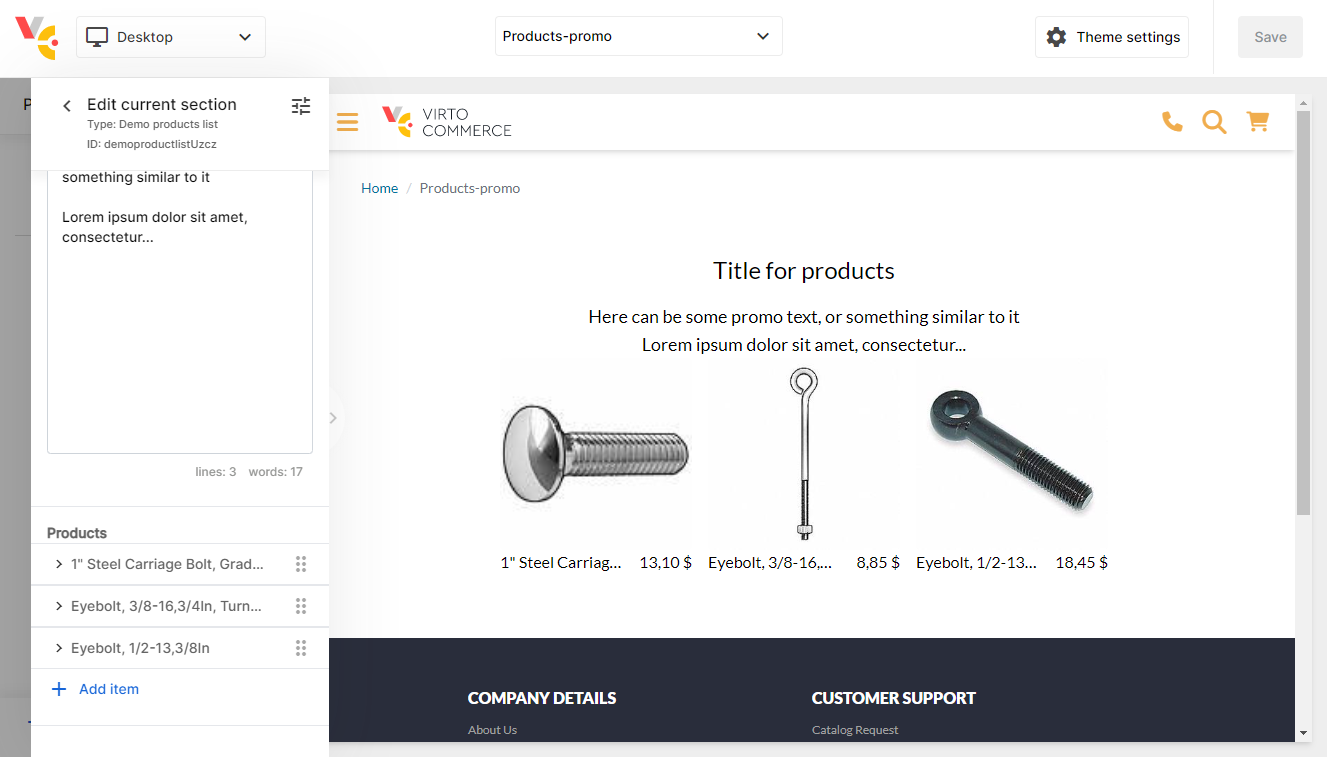
The block has been added to the page, and we can see it in the preview area:

Step 7: Add Property for Products to Block
Now we need to add products to the block. Open the file with the block settings and add the following item to the settings section:
{ ... "settings": [ ... { "id": "products", "label": "Products", "type": "list", "default": [], "displayField": "product.name", "element": [ { "id": "product", "label": "Product", "type": "select", "equalKey": "id", "request": { "url": "/graphql", "method": "post", "body": { "operationName": null, "variables": {}, "query": "{products(storeId:\"{{location.params.storeId}}\"){items{id,code,name,imgSrc,prices{currency,list{formattedAmount}}}}}" }, "cacheable": true, "response": { "result": "data.products.items" }, "label": "name" } } ] } ] }
We now can get products in the page builder:

Last Step: Layout for Product List
The last step to complete the block is the product display in the Vue component. Open the block layout file and add the following code:
<div class="flex flex-row justify-center space-x-4"> <div v-for="item in model.products" :key="item.product?.id" :product="item"> <div v-show="item.product" class="flex flex-col w-48"> <VcImage :src="item.product.imgSrc" :alt="item.product.name" size-suffix="md" class="w-full h-full rounded object-cover object-center select-none space-x-4" /> <div class="flex flex-row space-x-4"> <div class="grow truncate">{{ item.product.name }}</div> <div class="whitespace-nowrap">{{ item.product.prices[0].list.formattedAmount }}</div> </div> </div> </div> </div>
Finally, here is the result: